How to Invite Users to Your Tenant
This guide will walk you through the complete process of inviting users (athletes) to your tenant workspace on The FitCorp platform. You can invite users one at a time or import multiple users at once.
Before You Start
Make sure you have the following ready:
- Access to your tenant admin account
- The email addresses of users you want to invite
- Permission to manage users in your workspace
Log In to Your Tenant Account
- •Go to The FitCorp portal
- •Select one of the following login options:
1. Log in with a code
2. Continue with Apple
3. Continue with Google
- •You'll be taken to your tenant dashboard

Expected result: You're logged into your tenant account and see the dashboard.
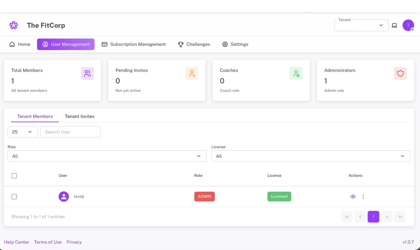
Navigate to User Management
- •On the dashboard, look for the main navigation menu
- •Click on the "User Management" tab
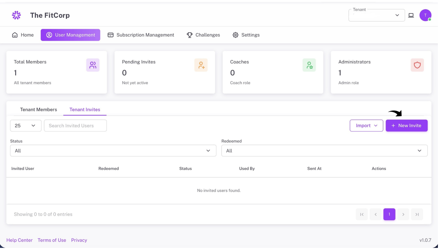
- •You'll see the User Management page with member statistics

Expected result: You're on the User Management page with all user statistics visible.
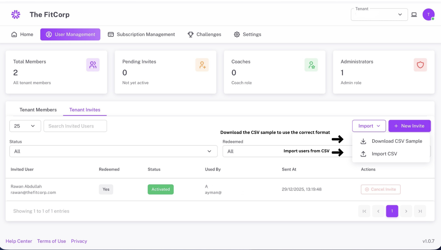
View Tenant Invites Tab
- •On the User Management page, you'll see two tabs: "Tenant Members" and "Tenant Invites"
- •Click on the "Tenant Invites" tab
- •This shows all pending and redeemed invitations
Expected result: You can see the Tenant Invites tab with a list of all invitations.
Click the "New Invite" Button
- •On the Tenant Invites page, look for the "+ New Invite" button (purple button)
- •Click the "+ New Invite" button
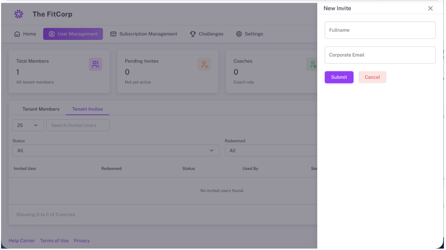
- •A "New Invite" dialog will appear
Expected result: The New Invite dialog appears with form fields.
Enter User's Name & Email
Step 5: Enter the User's Full Name
- •In the "New Invite" dialog, locate the "Fullname" field
- •Enter the user's full name (e.g., John Smith or Jane Doe)
- •Make sure the name is correct
Important: Use the user's actual full name. This will be displayed in the system. Double-check for spelling.
Step 6: Enter the User's Corporate Email
- •Locate the "Corporate Email" field
- •Enter the user's corporate email address (e.g., john.smith@fitnesscorp.com)
- •Make sure the email is correct
Important: Use a valid corporate email address. Double-check for typos. The user will receive an invitation at this email.
Expected result: Both the full name and corporate email are entered correctly in the dialog.
Review & Submit
Step 7: Review the Invitation Details
- •Review all the information you've entered:
Full Name: Correct?
Corporate Email: Correct?
Step 8: Click the "Submit" Button
- •Click the purple "Submit" button
- •The invitation will be sent to the user's email
- •You'll see a confirmation message: "Invite code created"
Expected result: The invitation is sent and you see a success message.
Verify the Invitation Was Sent
- •The user will appear in the "Tenant Invites" list
- •Status will show "Pending" (not yet redeemed)
- •You can see the date and time the invitation was sent
- •The user will receive an email with an invitation link
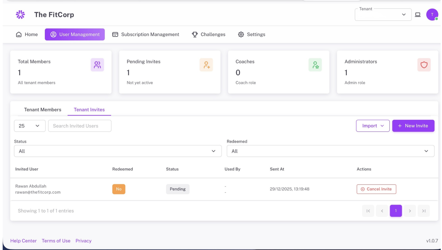
Expected result: The invited user appears in the list with "Pending" status.
User Receives & Accepts Invitation
Step 10: User Receives Invitation Email
- •The invited user will receive an email from The FitCorp
- •Subject: "Your invitation to [Tenant Name] on The FitCorp"
- •Email contains: Invitation message, link to accept, and QR code to scan
Step 11: User Accepts Invitation
- •User clicks the invitation link or scans the QR code in the email
- •User's account is created and they're added to your tenant
Expected result: User receives the invitation email and can click to accept.
Check Invitation Status
- •Go back to the "Tenant Invites" tab
- •Find the user in the list
- •Status will change from "Pending" to "Activated"
- •"Redeemed" column will show "Yes"
- •"Used By" will show the user's email
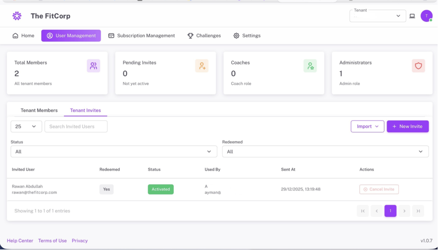
Expected result: The user's status changes to "Activated" and shows as redeemed.
Invite Multiple Users (Optional)
- •Repeat steps 4-9 for each user you want to invite
- •Or use the "Import" button to import multiple users at once
- •Import allows you to upload a CSV file with multiple users
Expected result: You can invite multiple users efficiently.
User Roles Explained
Athlete
- Can join challenges
- Track fitness progress
- View leaderboards
- Earn badges and achievements
- Cannot create challenges or manage users
Coach
- Can create and manage challenges
- Can manage users or tenant settings
Administrator
- Full access to all features
- Can manage users and invitations
- Can manage subscriptions
- Can create and manage challenges
- Can view all analytics and reports
Troubleshooting
Email already exists in the system
- Check if the user is already a member
- Check if the user was already invited
- Use a different email address if available
- Contact support if the email is duplicated
Invitation email not received
- Check the user's spam or junk folder
- Wait a few minutes - emails can take time
- Verify the email address is correct
- Resend the invitation
- Check if the email address is valid
User can't accept the invitation
- Check if the invitation link has expired
- Send a new invitation
- Make sure the user has access to their email
- Verify the email address is correct
- Contact support if the issue persists
Can't find the user in the list
- Check the "Status" filter - make sure it's set to "All"
- Use the search box to find the user by name or email
- Check the "Redeemed" filter
- Scroll down to see more users
- Verify the user was actually invited
Security Best Practices
Keep Your Tenant Secure:
- 1Only invite trusted users - Verify user identity before inviting
- 2Use corporate emails - Avoid personal email addresses
- 3Review pending invites - Cancel invitations that are no longer needed
Quick Reference
| Step | Action | Time |
|---|---|---|
| 1 | Log in to tenant | 1 minute |
| 2 | Navigate to User Management | 30 seconds |
| 3 | Click Tenant Invites tab | 10 seconds |
| 4 | Click New Invite button | 10 seconds |
| 5 | Enter full name | 30 seconds |
| 6 | Enter corporate email | 30 seconds |
| 7 | Review details | 30 seconds |
| 8 | Click Submit | 10 seconds |
| 9 | Verify invitation sent | 30 seconds |
| 10 | User receives email | 2-5 minutes |
| 11 | User accepts invitation | 5-10 minutes |
| 12 | Check activation status | 30 seconds |
| Total | Invite one user | ~10-20 minutes |
Pro Tips
Make Inviting Users Easier:
- 1Prepare a list - Have all email addresses ready before inviting
- 2Use Import - For multiple users, use the CSV import feature
- 3Send reminders - Follow up with users who haven't accepted
- 4Batch invites - Invite multiple users at once using import
- 5Document roles - Keep track of who has which role
- 6Review regularly - Check your user list periodically
- 7Communicate clearly - Let users know what to expect
Need More Help?
If you encounter any issues not covered in this guide:
- •FAQ Section: Check the help center for common questions
- •Video Tutorials: Visit our YouTube channel for visual guides
- •Contact Support: Reach out to our support team at support@thefitcorp.com
Welcome to User Management!
You're now ready to invite users to your tenant workspace. Start building your team and managing your fitness challenges!